How to Fix: “Steam Needs to Be Online to Update”

Download links
download now


Download links
download now
Solution 1 – Run Steam in Compatibility mode
- Right click Steam’s shortcut and select Properties.

- Go to Compatibility tab.
- Check Run this program in compatibility mode for and choose Windows 7 from the list of options.

- Optional: You can also check Run this program as an administrator option.
- Try starting Steam again.

Solution 2 – Disable Windows Firewall
Few users that had “Steam needs to be online to update” error reported that disabling Windows Firewall fixed the error for them. To disable Windows Firewall, do follow these steps:


- Press Windows Key + S, type Firewall and select Windows Firewall from the list of results.
- When Windows Firewall starts, click on Turn Windows Firewall on or off.

- Select Turn off Windows Firewall (not recommended) for both private and public network settings.
- Click OK to save changes.

Disabling firewall isn’t recommended, so after you’ve updated Steam, be sure to turn on Windows Firewall back again.
Solution 3 – Delete files from Steam directory
- Go to Steam’s installation directory. By default it should be C:Program FilesSteam or C:Program Files (x86)Steam.
- Delete all files except Steam.exe and Steamapps folder.
- Restart your computer.
- After your computer boots, go to Steam’s installation directory again and run Steam.exe.
Solution 4 – Use Registry Editor
If you’re having “Steam needs to be online to update” error on Windows 10, you should be able to fix it by changing few registry values. To change the registry do the following:
- Press Windows Key + R and type regedit. Click OK or press Enter.

- When Registry Editor opens, go to HKEY_CURRENT_USER/Software/Valve/Steam.
- In the right pane click on Offline DWORD and set its Value Data to 0.
- Close Registry editor, restart your computer and check if the problem is resolved.

Solution 5 – Copy Steam files from another computer
In order to complete this solution, you’ll need another computer with working version of Steam and a USB flash drive.
- Go to the other computer and copy all files from Steam’s installation directory, except Steamapps folder, to USB flash drive.
- Connect the USB flash drive to your computer and paste all the files to your Steam installation directory. When asked to overwrite files, click Yes.
- Run Steam.exe to check if the issue is resolved.
Solution 6 – Add -tcp parameter to Steam shortcut
- Locate Steam shortcut and right click it.

- Choose Properties from the menu.
- Go to Shortcut tab and in the Target section add -tcp after the quotation marks.

- Click Apply and OK to save changes.
- Optional: Go to Compatibility tab and check Run this program as administrator.

- Run the shortcut and check if the issue is resolved.
Solution 7 – Turn off Proxy settings in Internet Explorer
- Press Windows Key + S and type Internet Explorer. Choose Internet Explorer from the list of results.

- When Internet Explorer starts, click on Tools icon in the top right corner and choose Internet Options from the menu.

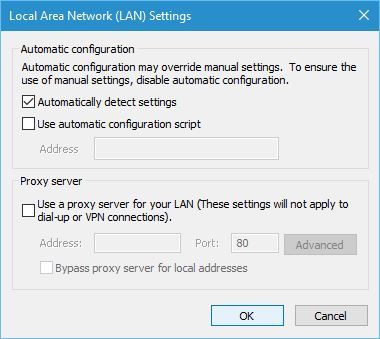
- After Internet Options window opens, go to Connections tab and click on LAN settings.

- Make sure Use a proxy server for your LAN is not checked. Click OK to save changes and please uncheck "Automatically detect settings"
Solution 8 – Temporarily disable your antivirus
In some cases “Steam needs to be online to update” error can be caused by your antivirus software, and if that’s the case, you’re advised to add Steam to the list of exceptions in your antivirus software and firewall. If adding Steam to list of exceptions doesn’t work, disable your antivirus and try running Steam again. If the problem still persists, perhaps you should temporarily uninstall your antivirus or switch to a different security software.
Solution 9 – Use Google’s DNS
Sometimes this error can be caused by your DNS settings, and if that’s the case, you’re advised to switch your DNS to Google’s DNS. To do that, follow these steps:
- Press Windows Key + S and type Network and Sharing. Choose Network and Sharing Center from the list.

- Click on Change adapter settings. You should see the list of network adapter. Right click your current network adapter and choose Properties.

- Select Internet Protocol Version 4 (TCP/IPv4) and click Properties.
- When Internet Protocol Version 4 (TCP/IPv4) Properties window opens, click the Advanced button.

- Go to DNS tab. If you have any addresses in DNS section, write them down in case you need them.
- Click Add and enter 8.8.8.8 and/or 8.8.4.4.

- Save changes and restart your network connection.
- Try to start Steam again.
Solution 10 – Edit hosts file
- Press Windows Key + S and type Notepad. Right click Notepad from the list of results and choose Run as administrator.

- When Notepad opens, go to File > Open.
- Navigate to C:WindowsSystem32driversetc folder.
- Double click hosts file to open it. If you don’t see any files make sure to change Text Documents to All Files in the bottom right corner.

- When hosts file opens add the following lines at the end:
- 68.142.122.70 cdn.steampowered.com
- 208.111.128.6 cdn.store.steampowered.com
- 208.111.128.7 media.steampowered.com
- Save changes and close Notepad.
- Press Windows Key + X and choose Command Prompt from the menu.

- When Command Prompt starts, enter the following and press Enter to run it:
- ipconfig /flushdns

- ipconfig /flushdns
- Close Command Prompt and start Steam again.
Few users are suggesting to add 87.248.210.253 media.steampowered.comat the end of hosts file, so you can try that as well. According to alternative solution, you can fix this problem by adding the following to hosts file:
- 208.64.200.30 media1.steampowered.com
- 208.64.200.30 media2.steampowered.com
- 208.64.200.30 media3.steampowered.com
- 208.64.200.30 media4.steampowered.com
Solution 11 – Set Steam Client Services Startup Type to Automatic
- Press Windows Key + R and type services.msc.

- When Services window opens locate Steam Client Service and double click it.
- In Steam Client Service locate Startup type and change it from Manual to Automatic.

- Click Apply and OK to save changes.
- Restart your computer and start Steam again.
Solution 12 – Disable Steam from automatically starting
In some rare cases, “Steam needs to be online to update” error can be caused if Steam starts but your computer doesn’t manage to establish a network connection. To fix this problem, it’s advised that you disable Steam from automatically starting by following these steps:
- Open Steam.
- Go to Steam > Settings.

- Go to Interface tab and uncheck Run Steam when my computer starts.

- Click OK to save changes.
Solution 13 – Run SteamTmp.exe
If you’re getting “Steam needs to be online to update” error message, you should try running SteamTmp.exe from Steam’s installation directory. Few users reported that running SteamTmp fixed their problems, so you might want to try that.
If you’re still having issues with your apps or you simply want to avoid them for the future, we recommend you to download this tool to fix (100% safe and tested by us) various PC problems, such as hardware failure, but also file loss and malware.
“Steam needs to be online to update” error can cause you a lot of problems, but we hope that our solutions were helpful to you.
Author

Hi, Its me Hafeez. A webdesigner, blogspot developer and UI/UX Designer. I am a certified Themeforest top Author and Front-End Developer. I'am business speaker, marketer, Blogger and Javascript Programmer.


0 comments:
Post a Comment